Zip and Share (WinZip Express) for Explorer
Beginning with WinZip® 27.0 Zip and Share has been discontinued. Instead the WinZip SafeShare feature (applet) has been added.
Zip and Share, the WinZip Express for Explorer add-on, gives you instant access to WinZip's most popular features right from Windows Explorer. Just right-click files and/or folders to launch Zip and Share (WinZip Express), then choose your settings for encryption, image resizing, sharing, and more.
Launching Zip and Share (WinZip Express)
To launch Zip and Share (WinZip Express), right-click a file or folder in Windows Explorer and click Zip and Share (WinZip Express). 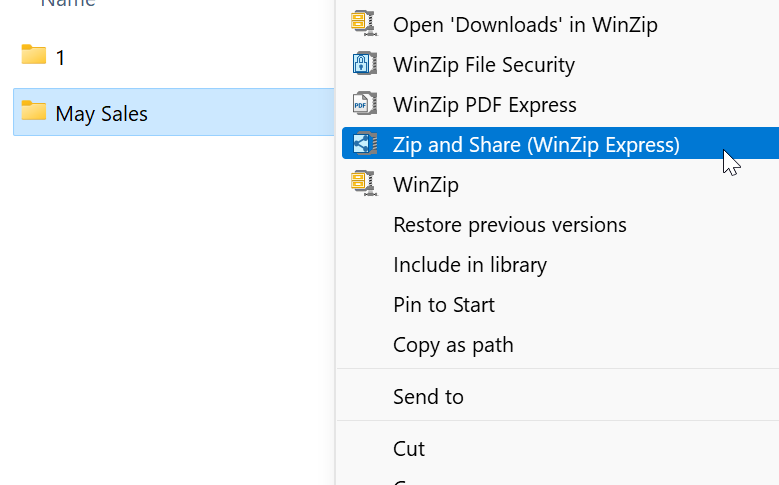
To zip and share multiple files and/or folders, select them and then right-click one of the items you selected.
Using Zip and Share (WinZip Express)
When Zip and Share (WinZip Express) is launched, you will see the WinZip Express dialog:
Simply set the options the way you want them and click Create New Zip File.
Type a name for the Zip file
WinZip will suggest a unique name for the Zip file. You can change the name here by simply typing it. If you are going to save the Zip file to your PC, don't include the folder name here; that will be specified when the Zip file is saved.
Compression type
Choose what type of compression you would like WinZip to use.
- .Zip: Legacy compression: Choose this option if you frequently share your files with others who may be using older Zip file utilities. The compressed files will usually be larger than they would be if compressed with the Best method option, but your recipients will be able to use any Zip file utility to view them.
- .Zipx: Best method: Choose this option to provide optimal compression for minimal use of storage space. Best method uses a special compression method that compresses JPEG pictures better than other methods with no loss of picture quality (there is no loss of picture quality with any WinZip compression method). Choosing Best method will result in a .zipx file. To extract these Zip files, you will need WinZip 12.1 or later.
Encryption
Check Encrypt files if you want to encrypt the files as they are added to your Zip file. Click the settings button (>) to select the type of encryption.
Conversions
These options allow you to convert Office documents to PDF files, and to resize and/or watermark PDFs and images that are being added to your Zip file.
- Check Convert from PDF to all PDF files being added to one of 6 available file types.
- Check Reduce photos if you want to reduce the size your pictures and other images as they are added. Click the settings button (>) to select the desired size.
- Check Remove Personal Data if you want to remove all EXIF metadata from files (DOC, DOCX, GIF, JPG, PDF, PNG, PSD, PPT, PPTX, XLS, XLSX).
- Check Convert Photos to convert image files (BMP, GIF, JPG, JP2, PNG, PSD, TIF, and WEBP) from one file type to another.
- Check Watermark if you want to add a watermark to your PDFs, pictures, and other images as they are added. Click the settings button (>) to select the watermark and the watermarking options.
- Check Convert to PDF to convert Word documents, Excel spreadsheets, and PowerPoint presentations to PDF files as the are added. Click the settings button (>) to set PDF conversion options.
- Check Combine Files into a PDF to have all files converted into 1 PDF file before it is zipped.
- Check Sign PDF files to add your signature to PDF files (a proper signature certificate must be created and configured).
Share/Save Options
This section tells WinZip what to do with the finished Zip file. The options allow you to save and/or share the file.
- Save Zip file to: If you want to save your Zip file, choose My PC/Cloud (to save the file to your PC, network location, or cloud storage service). Note that you don't need to save the Zip file in order to share it using the options described below.
- Share as Attachment using: Check the E-mail option if you want to send your Zip file as an email attachment. You will have an opportunity to specify the recipients, subject, and content.
- Share as Link using:
- E-mail: WinZip will upload the Zip file to a cloud service and then create an email message containing a link to the file. You will have an opportunity to specify the recipients, subject, and content.
- Instant Messaging: WinZip will upload the Zip file to a cloud service and then send a link to the file via instant messaging. You will have an opportunity to specify the message content and select the recipients.
- Social media: WinZip will upload the Zip file to a cloud service and send a link to the file via Facebook, Twitter, or LinkedIn. You will have an opportunity to select the service and, for Facebook and LinkedIn, the recipients.
- Windows Charms (only available when opened from the WinZip user interface): Click this option to choose a Windows Charm (app) to use for sharing your file, after it has been uploaded to a cloud service.
- Clipboard: WinZip will upload the Zip file to a cloud service and copy the link to the clipboard. You can then paste the link into a document or message type of your choosing.
Note that you can choose more than one option in the Share as Link section.
Schedule for Deletion
If you have configured the Schedule for Deletion option to be on and if you are saving the Zip file being created to your hard drive, you can check this box and have the file automatically deleted at the number of days configured.
Additional option buttons
At the bottom of the WinZip Express window are 3 buttons that allow you to:
- Save the settings you just used in Zip Share.
- Save the settings and schedule the option to happen later.
- Reuse saved options (open settings you saved earlier).
Related topics
- Find more WinZip Express Add-Ons.