| This article pertains to WinZip 18.5 and earlier. It is being maintained as archived information. The article describes how to zip files using the WinZip ribbon interface in Windows 7. |
Zipping options
Before you start zipping files, you may want to configure the options available in the Advanced section of the Create/Share (Edit) tab and/or you may want to click one or more of the buttons in the Convert Files As They Are Added section. Except for Full Path Information, the items in the Options drop down menu will default to being off whenever you open WinZip. You should also inspect and configure the options available in the Settings tab.
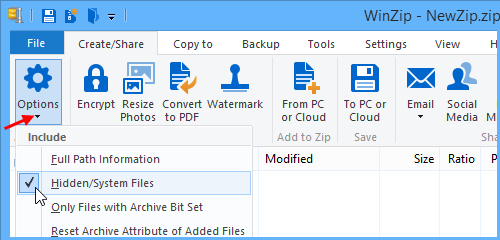
A number of broad category filters (Office Files, Documents, Pictures, etc.) will be available to you in the Add dialog every time you zip files. However, if you want to specifically filter the files you will be adding so that one or more file extensions are added or so that one or more file extensions are excluded, you can click Add a Filter on the Options drop down menu to create your specific filter. After you have created a filter, it will be available on the Options drop down menu for future file zipping. It can also be edited or removed.
The From PC or Cloud button
When you have your options set as you like, you can click the From PC or Cloud button to open the Add dialog. Note: When a Zip file is open in WinZip, this button will be found on the Edit tab.
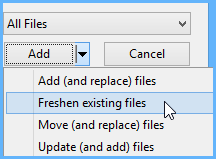
After finding the files and/or folders you want to zip, click the Add button in this dialog. If you set a custom filter, files will be included and/or excluded according to that filter. If you want to use one of the included broad category filters, you can choose it from the drop down menu that reads All Files by default. You can also choose Freshen, Move, or Update from the Add drop down menu.
Note: The broad category filters will not appear below All Files if you have already created and selected one of your own custom filters.
The WinZip window will now display showing what you have added. At this point, you can add more files or you can click To My PC or To Cloud in the Save section when you have finished. In the dialog that opens, you will need to browse to the location where you want to save your Zip file, type the name you wish to use, and click Save. You can share your Zip file before or after you save it.
If you have further questions about zipping files or you encounter an issue using this information, please submit a Technical Support ticket.
Related Articles:
Quick examples of how to zip files with WinZip
How to compress a folder and later restore it - 14.5 to 16.5
How to Zip files with their folder information
How to control folder information stored in a Zip file - 16.5 and earlier
Was this article helpful?
Tell us how we can improve it.